CentOS 7 Server Install using a bootable USB
Infrastructure Tutorials
Download CentOS 7 Server Install using a bootable USB tutorial.
In this tutorial, I will be demonstrating the creation of VirtualBox 6.1.2 virtual machine used to perform a server install using a bootable USB containing a CentOS 7 minimal ISO image. Please note that my host machine is Windows 7 Pro SP1.
Prerequisites
- VirtualBox 6.1.2 & VirtualBox 6.1.2 Extension Pack
- Bootable USB with CentOS 7 minimal ISO image
- Active Internet Connection
For instructions on how to install VirtualBox 6.1.2 or create a CentOS 7 bootable USB, please refer to my other tutorials VirtualBox Install, here, and Create a Bootable USB, here.
Steps to complete tutorial:
Install VirtualBox 6.1.2
If you already have VirtualBox 6.1.2 installed, go to the next step. Otherwise, please see one of my other tutorials,
VirtualBox Install, accessible here, where I demonstrate the installation of VirtualBox 6.1.2, as well as, the same version extension pack.
Create a Bootable USB
If you don’t already have a CentOS 7 bootable USB, complete my other tutorial where I demonstrate the creation of a CentOS 7 bootable USB, accessible here.
Then, return here to complete this tutorial, using your newly created CentOS 7 bootable USB.
Create virtual machine disk (VMDK) using a bootable USB
We will be using VirtualBox's VBoxManage command to create an image that represents our CentOS 7 bootable USB.
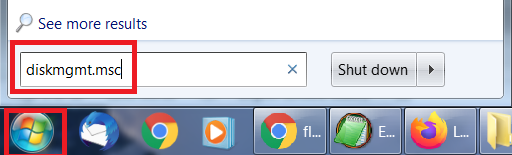
First, using the Windows Disk Management utility,
diskmgmt.msc, we will identify the disk number of our bootable USB.
To open the utility, click the Windows icon on your toolbar (bottom left), type diskmgmt.msc into the search box and hit the Enter key on your keyboard.
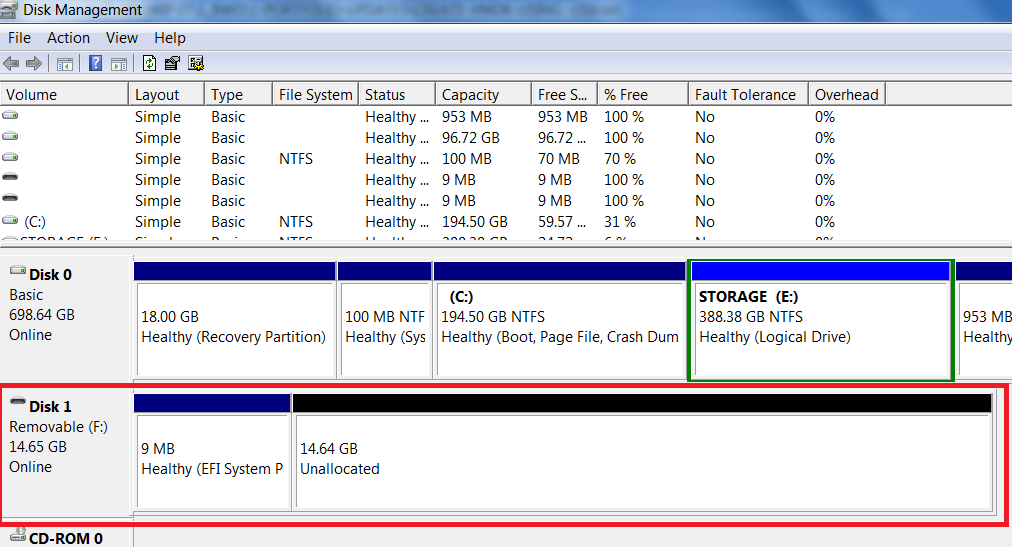
Look for your USB drive in the Disk Management window and note its disk number. In my case, it's Disk 1.
First, ensure VirtualBox is closed.
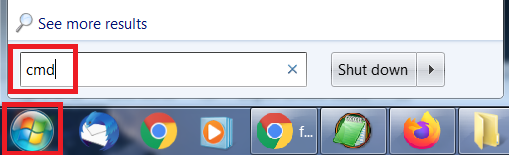
Next, open a Command Prompt as Administrator by pressing the Windows icon on your toolbar (bottom left), typing
cmd in the search box, then, right-click the Command Prompt shortcut (cmd.exe) that appears in the result, and select
Run as administrator.

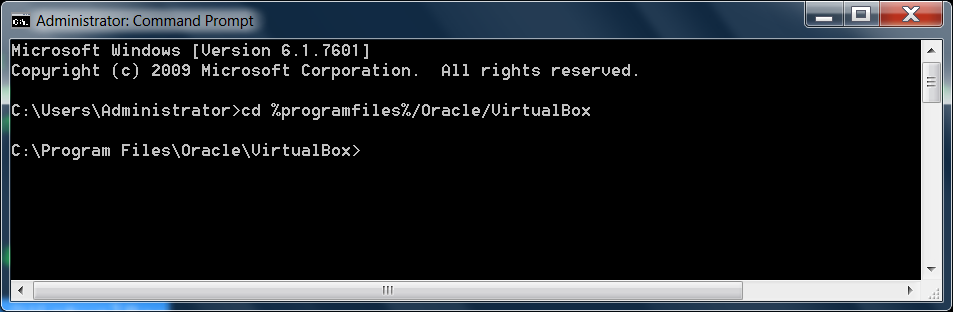
We will now need to navigate to VirtualBox's installation directory.
Please note, if you installed VirtualBox to a custom directory, change the command below to reflect your VirtualBox installation location.
Type the following command into the Command Prompt window and press Enter:
cd %programfiles%/Oracle/VirtualBox
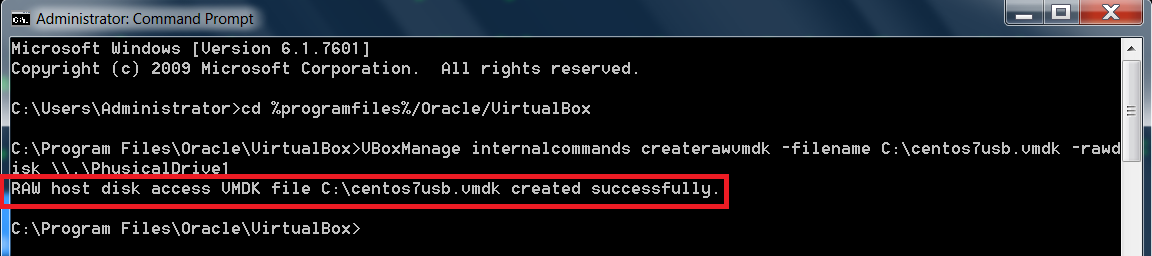
Next, type the following command into the Command Prompt window, replacing # with the number
of the disk you found in the Windows Disk Management utility.
VBoxManage internalcommands createrawvmdk -filename C:\centos7usb.vmdk -rawdisk \\.\PhysicalDrive#
In my case, since my USB is disk 1 in the Windows Disk Management utility, I will type:
VBoxManage internalcommands createrawvmdk -filename C:\centos7usb.vmdk -rawdisk \\.\PhysicalDrive1
Ensure you have the correct disk # for your bootable USB and that the entire command is entered on one line, then,
to execute, press Enter
This command creates a virtual machine disk (VMDK) file that points to the physical drive you select. When you load the VMDK file as a drive in VirtualBox, VirtualBox will actually access the physical device (your bootable USB).
Please note where the newly created .vmdk file is stored on your system. I chose to store it in the root of
my C:\ drive, but you can store it wherever you like. Just remember where it is stored for later in this tutorial.
Create virtual machine
Now we are ready to create our virtual machine using our newly created image file, C:\centos7usb.vmdk, that
points to your CentOS 7 bootable USB.
Before we begin, ensure your CentOS 7 bootable USB is inserted in one of your computer’s USB ports.
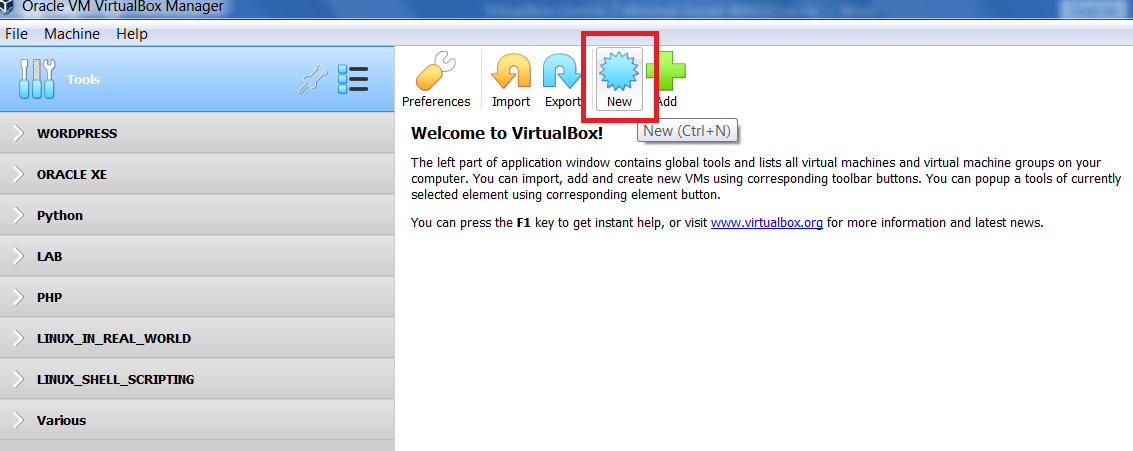
Next, start VirtualBox and on the VirtualBox Manager interface, click the New button to start the creation of a new virtual machine.
Please note that if you have just installed VirtualBox 6.1.2, you will only see Tools on the left-hand side of the VirtualBox Manager interface. I have already created a number of VMs (virtual machines) and grouped them for organizational purposes.
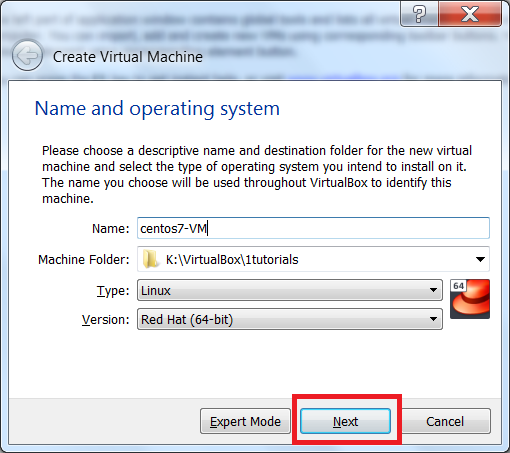
Name and OS
The Create Virtual Machine screen appears.
- Give your VM a name (I named my VM: centos7-VM)
- Choose where you want the machine created on your host system
-
Please note, you can change the destination folder (Machine Folder:), if the default does not work for you.
This will be where the virtual machine files are stored on your host system. - Ensure Type is set to Linux and Version is set to Red Hat (64 bit), click Next
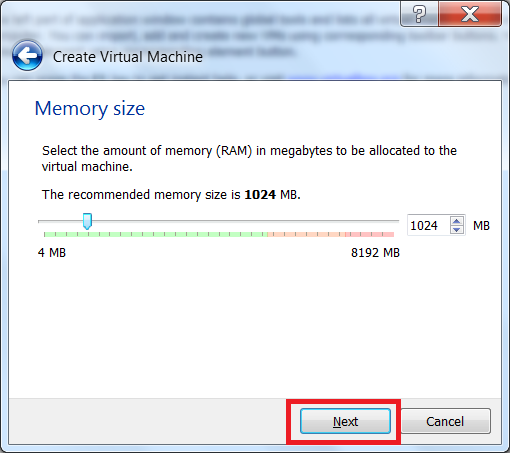
Memory Size
The next screen asks for the amount of memory (RAM) you wish to allocate to this machine.
Since we are performing a minimal server install, 1024MB (1GB) of RAM is sufficient. Click Next
Attach virtual machine disk (VMDK) to VM
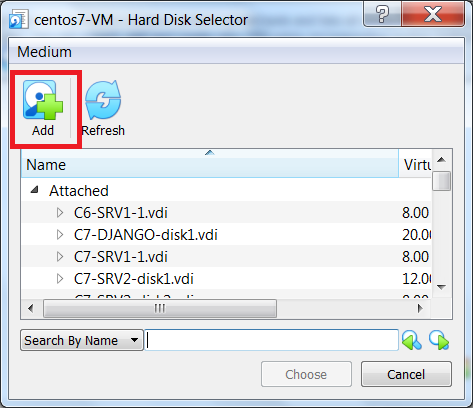
We will now need attach our newly created image file to the virtual machine.
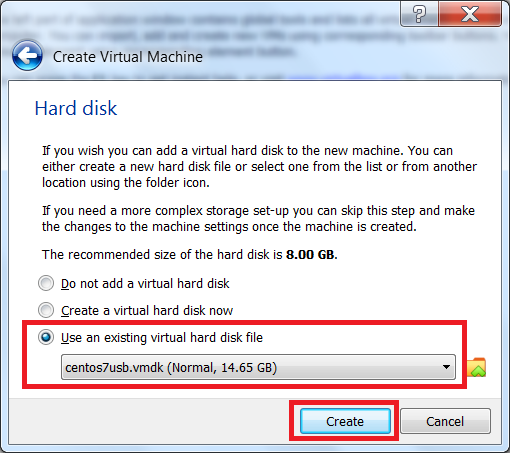
Ensure Use an existing virtual hard disk file is selected and click the browse icon to the right
to locate your .vmdk file.

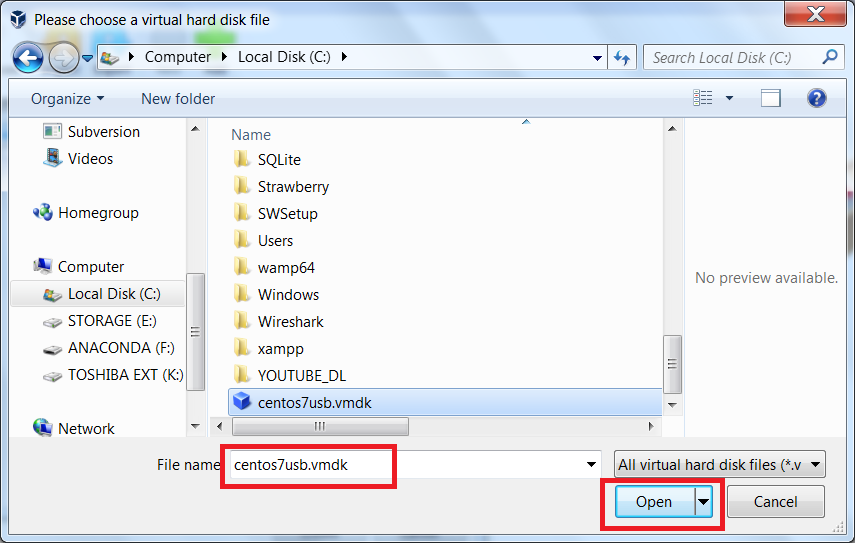
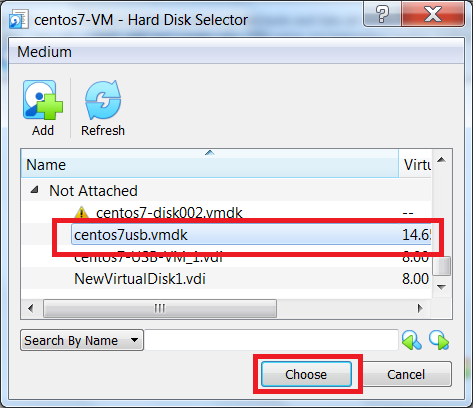
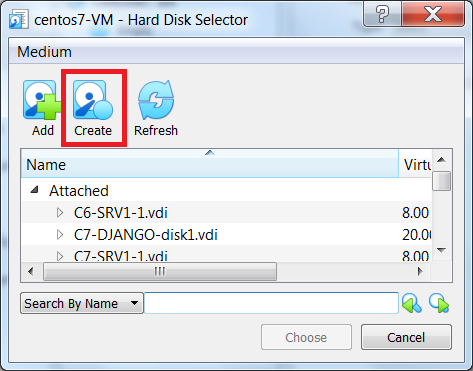
This will open VirtualBox’s Hard Disk Selector. First, click Add
Browse to where you created the image file that points to your CentOS 7 bootable USB
(in my case, C:\centos7usb.vmdk), select it and click Open
Once you have added the image file, locate it using the scroll bar and click choose
Now that we have selected our image file it will be used when we start the virtual machine.
To continue, click Create
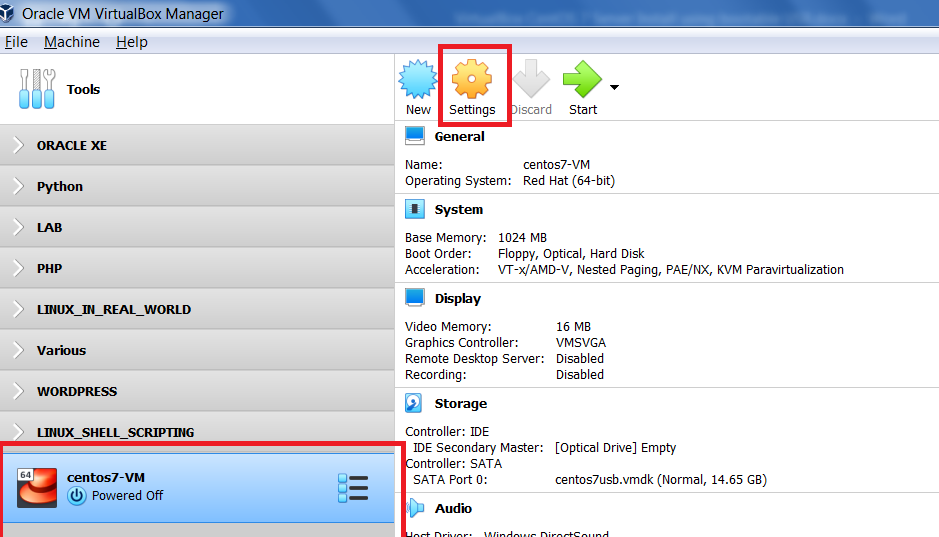
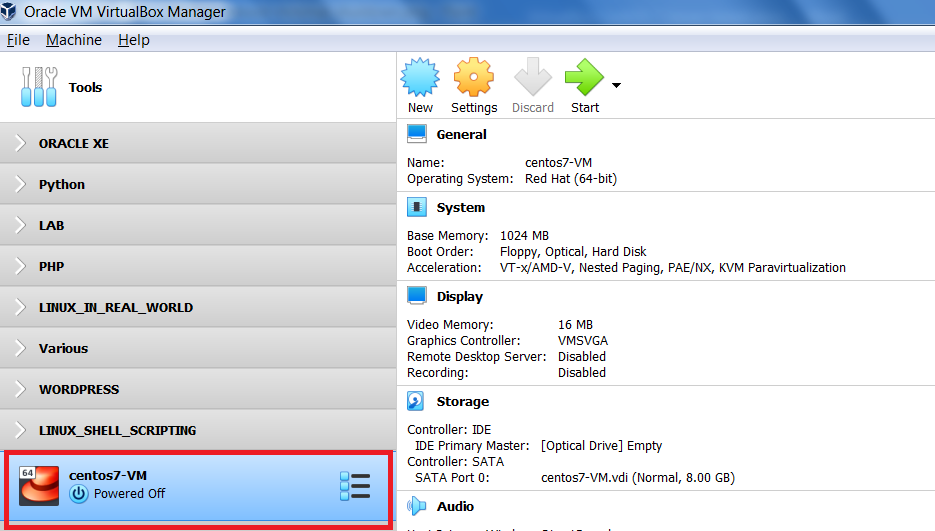
As you can see below, our centos7-VM virtual machine was successfully created.
Now we will need to add a virtual hard disk to act as our CentOS 7 installation location. To create a new virtual hard disk, from the VirtualBox Manager, ensure your VM is selected and click Settings
Create Hard Disk for CentOS 7 installation
In the Settings window, ensure the Storage tab is selected. Then, click the Adds hard disk button on Controller: SATA
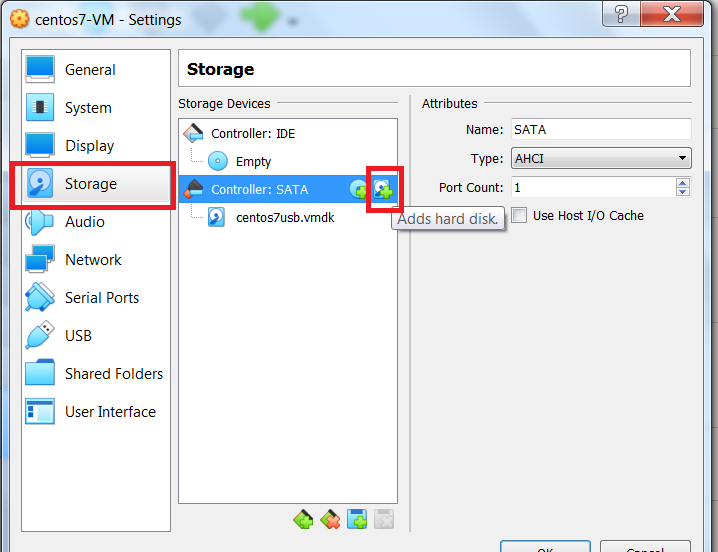
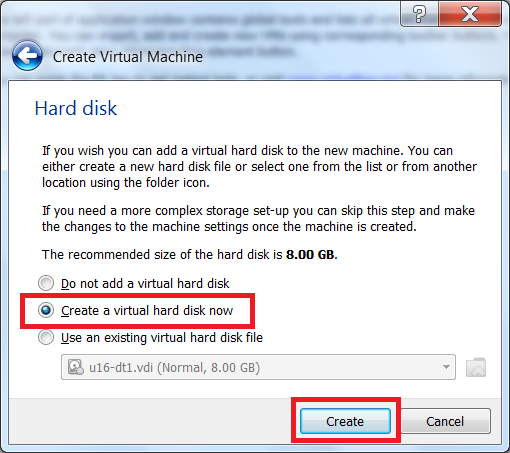
From the Hard Disk Selector screen, click Create
Now we must create a virtual hard disk where the operating system (CentOS 7) will be installed.
Note the recommended size (8 GB) of a virtual hard disk for CentOS 7. Click Create
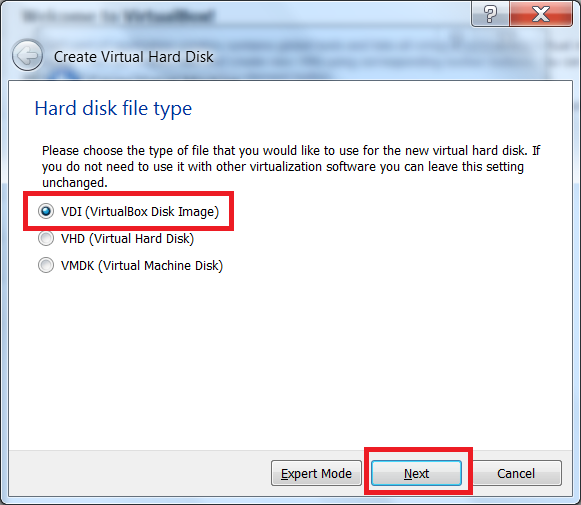
Now, you will have to choose the type of virtual hard disk. Select VDI and click Next
| VDI: | Oracle VirtualBox container format for guest hard disks |
| VHD: | Microsoft container format |
| VMDK: | VMWare container format |
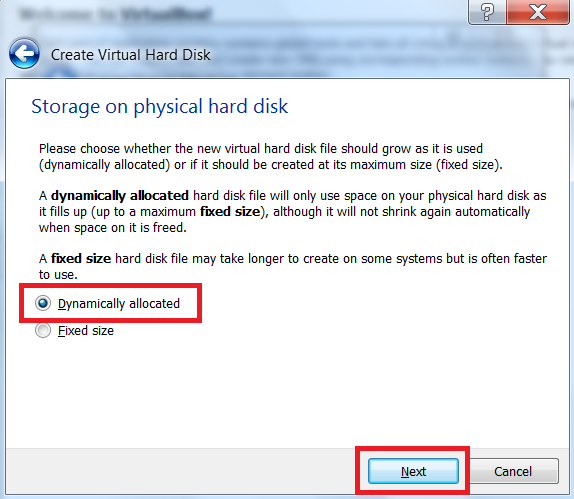
We can now choose whether the virtual hard disk takes up the size we allocate as needed (Dynamically allocated) or immediately (Fixed). To save space on my host system, I will be choosing Dynamically allocated and clicking Next
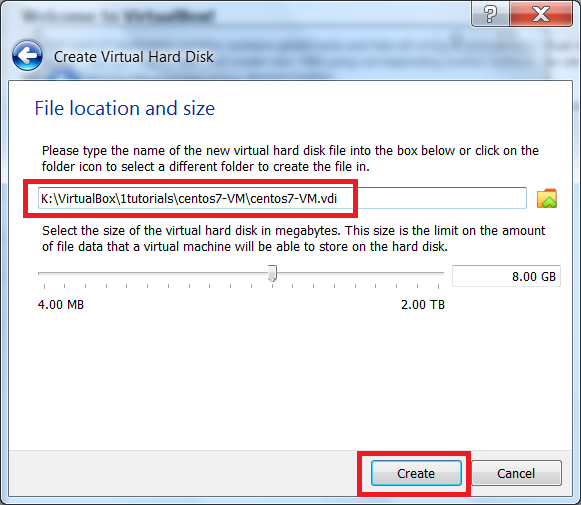
Here we can set the virtual hard disk size. Again, since we’re performing a minimal install, 8.00GB is enough.
Note it’s name and storage location. We will need the disk name for the next step. Click Create
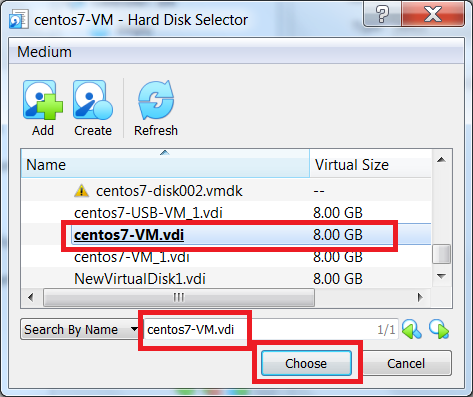
Back on the Hard Disk Selector screen, enter the newly created disk name in the search box and click Choose
After adding a virtual hard disk as our CentOS 7 install location, we are now ready to begin the installation.
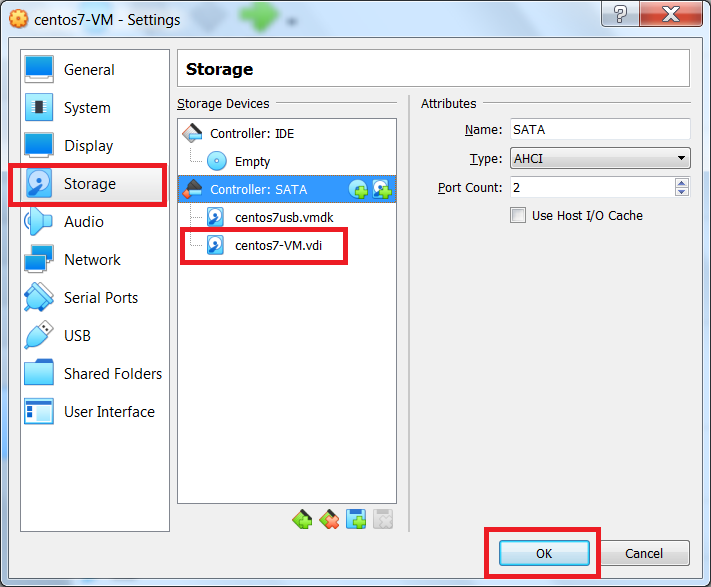
Please note that, under Controller: SATA, the .vmdk file (centos7usb.vmdk) pointing to the bootable USB MUST be first in the list, followed by the virtual hard disk (centos7-VM.vdi) being used as the CentOS 7 install location.
To continue, click OK.
Install CentOS 7
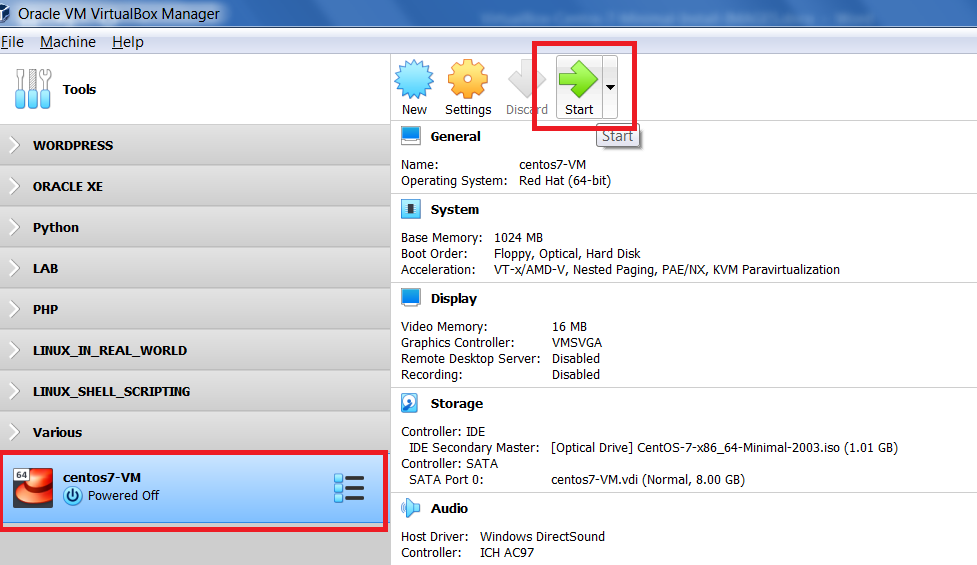
On the VirtualBox Manager Interface, ensure your new VM is selected and click Start
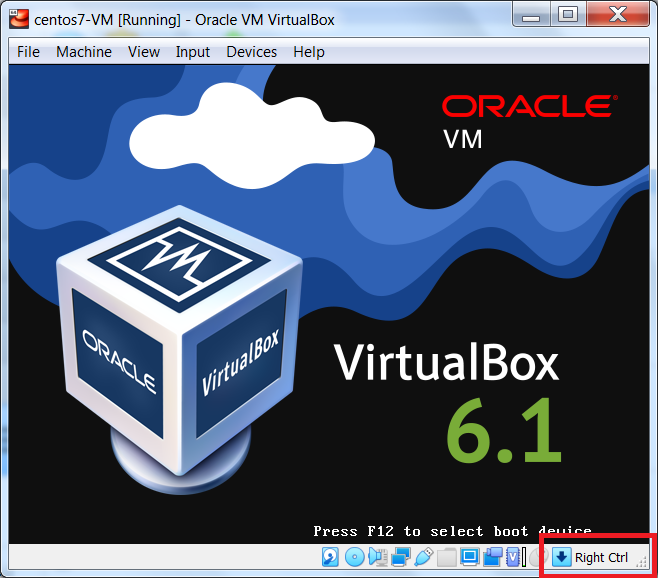
Friendly Reminder:
During installation, if at any time you need to exit the
guest (virtual machine) interface and return to the host machine interface, hit your Host key (for Windows 7, it’s the right Ctrl key). Check the bottom right-hand corner of the virtual machine's interface (see image below)
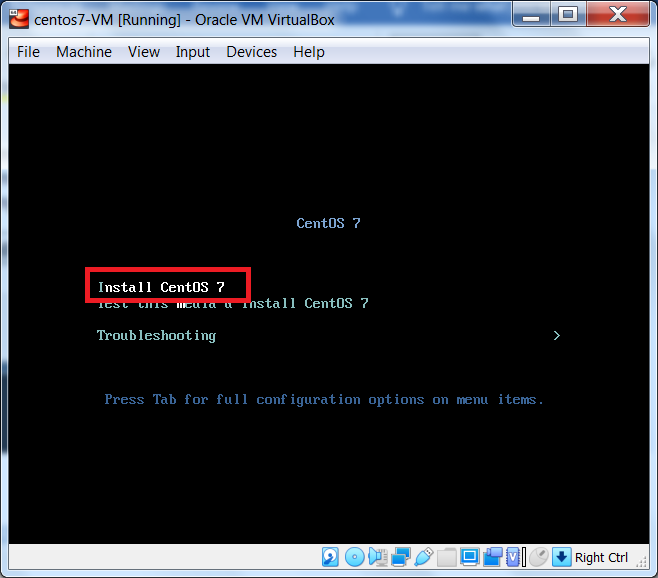
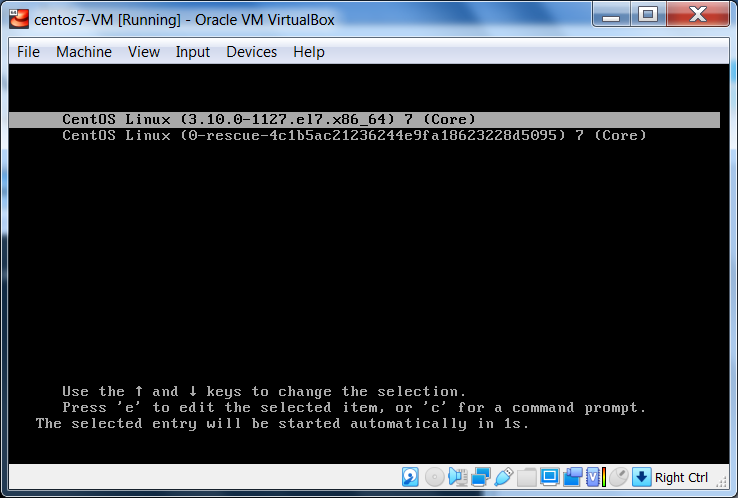
Next, navigate up to Install Cent0S 7 and, on your physical keyboard, hit the Enter key to begin the installation.
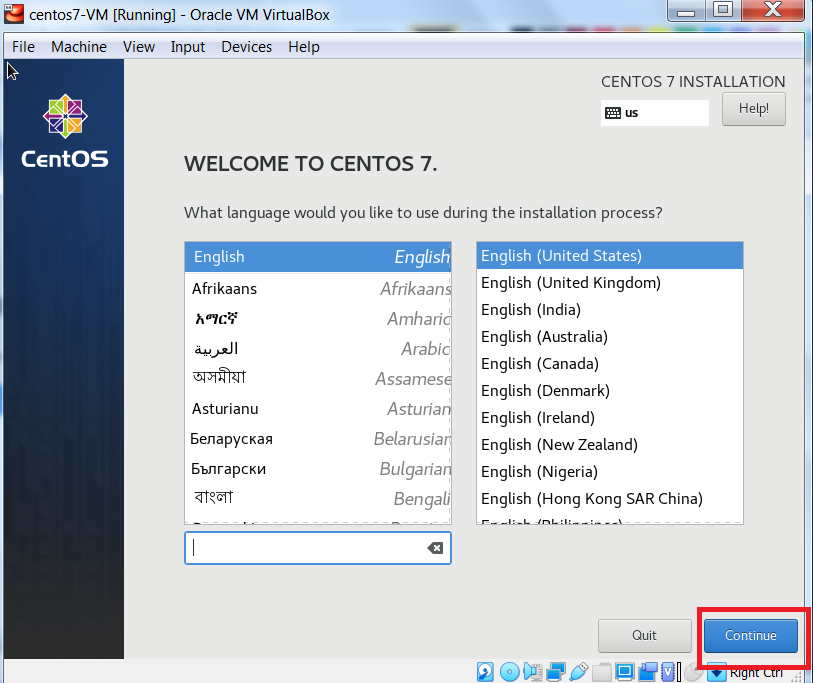
Select your desired language and click Continue
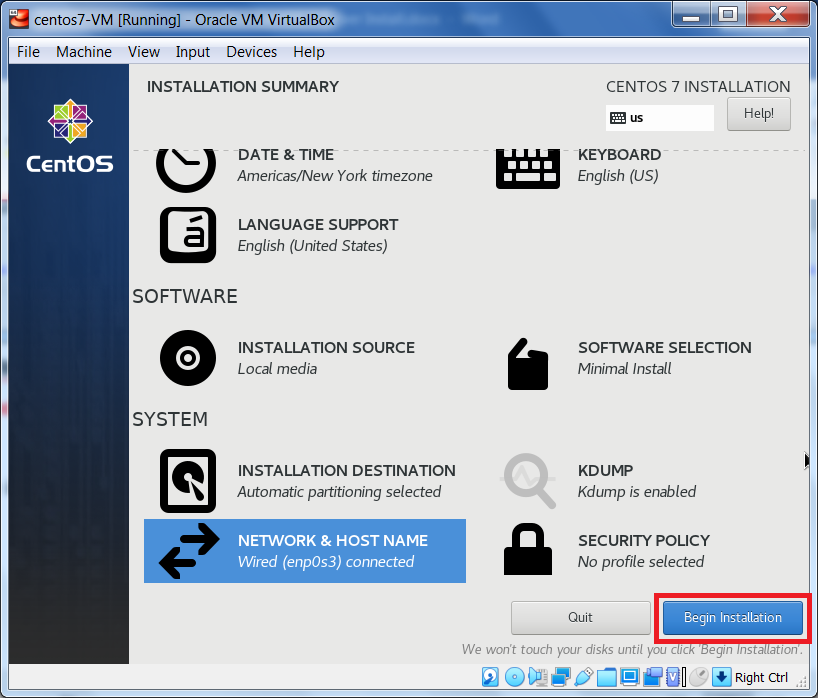
On the Installation Summary page, we need to configure a few settings before we can begin the installation.
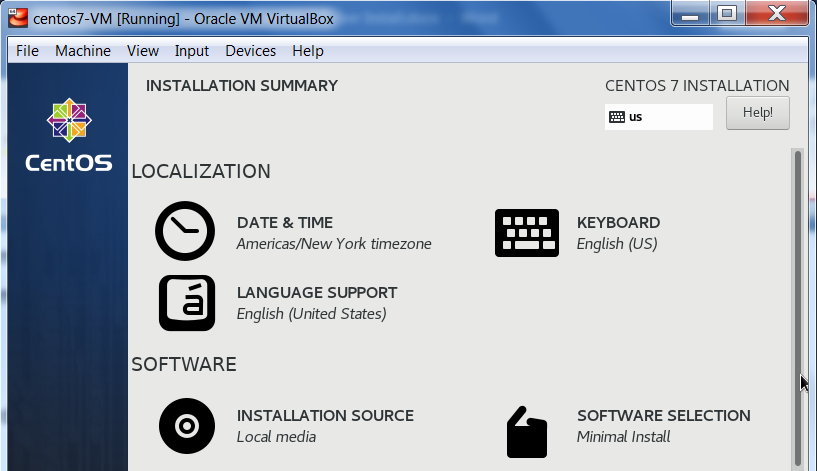
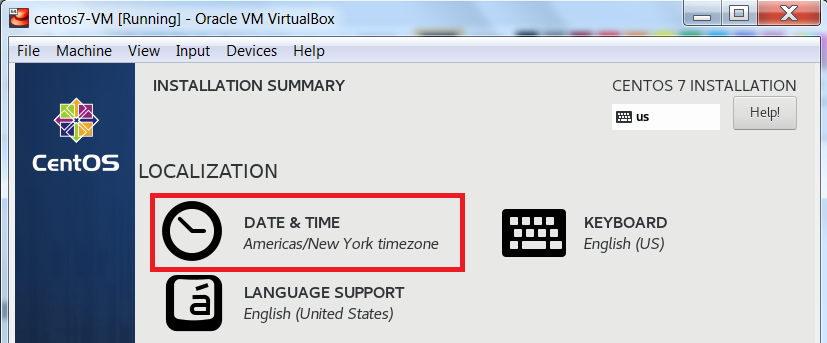
Localization:
- timezone, keyboard and language
- Installation source and software selection
- Installation destination (includes partitioning)
- Network & Host name
- KDump & Security Policy
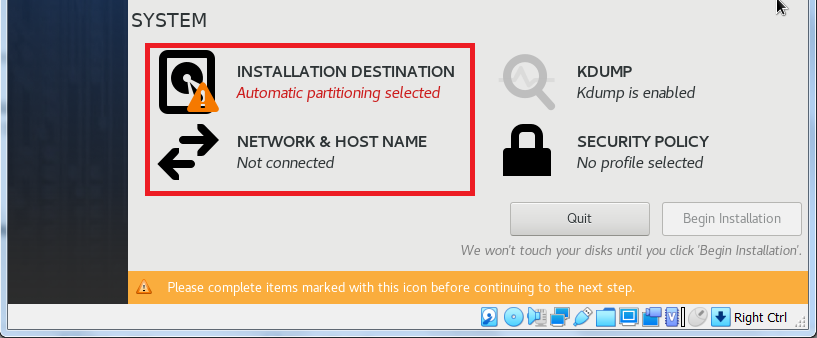
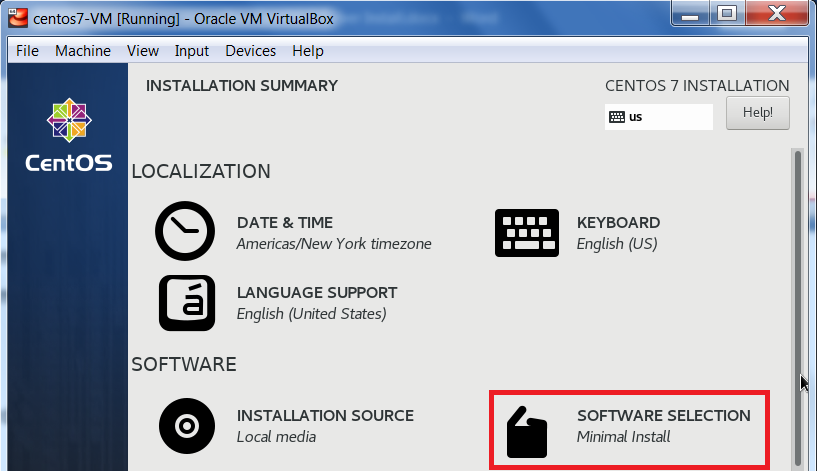
Please note that before we begin making the required pre-installation configuration changes, I will be referring to the items listed on the Installation Summary page (see items above OR image below). Also, if the correct item value is already set, you do not need to change it.
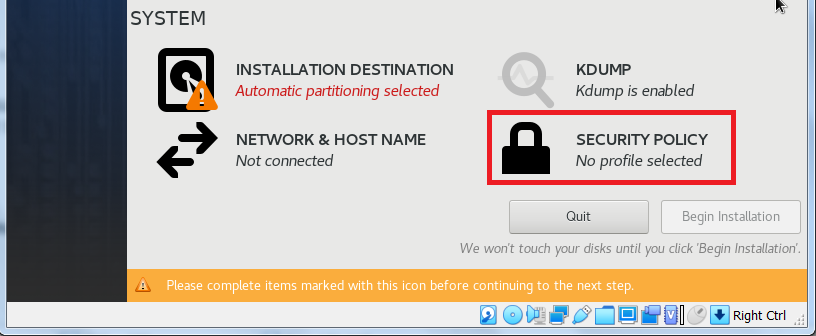
According to my Installation Summary page, only two items need to be configured. Under the System section, they are Installation Destination and Network & Host Name.
If your Installation Summary page is the same as mine, please skip to the System section.
If your Installation Summary page is different than mine, links to each section are available here:
Localization, Software and
System
To be thorough, we will go through each configuration screen for every item that is listed on the
Installation Summary page. That way you will become familiar with a CentOS 7 installation.
Localization
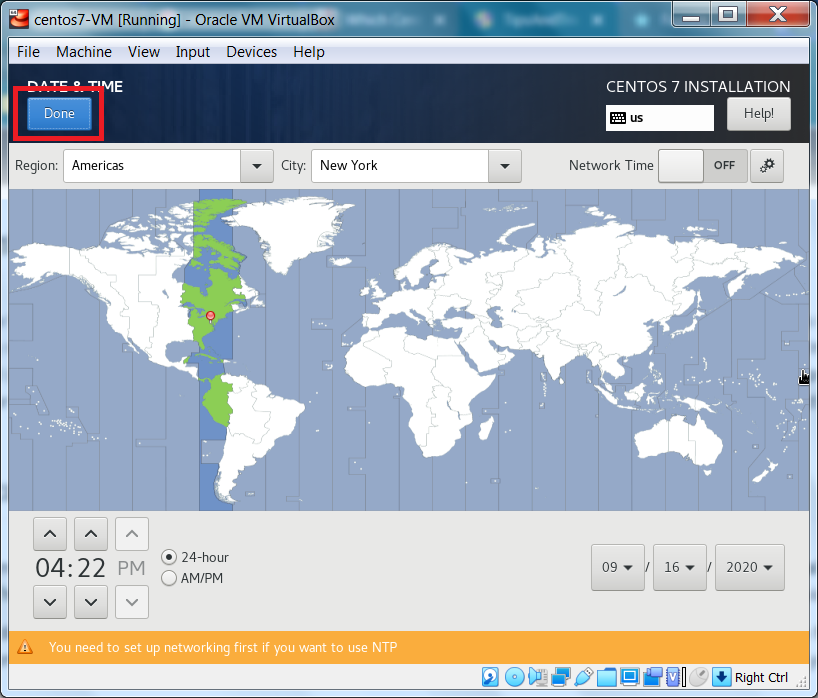
To set your timezone, from the Installation Summary page, click Date & Time.
Make your change, if needed, and click Done.
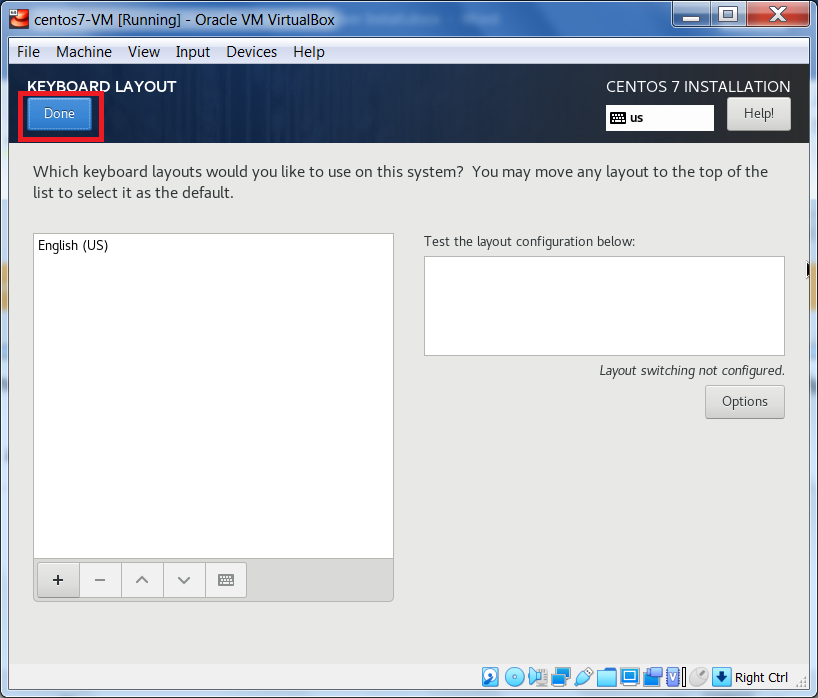
To set your keyboard, from the Installation Summary page, click Keyboard.
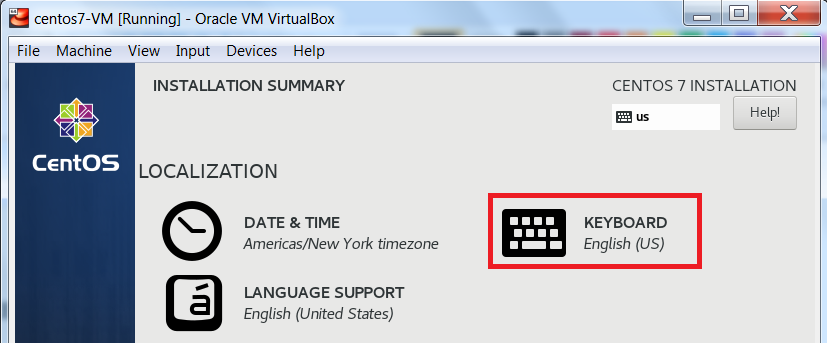
Make your change, if needed, and click Done.
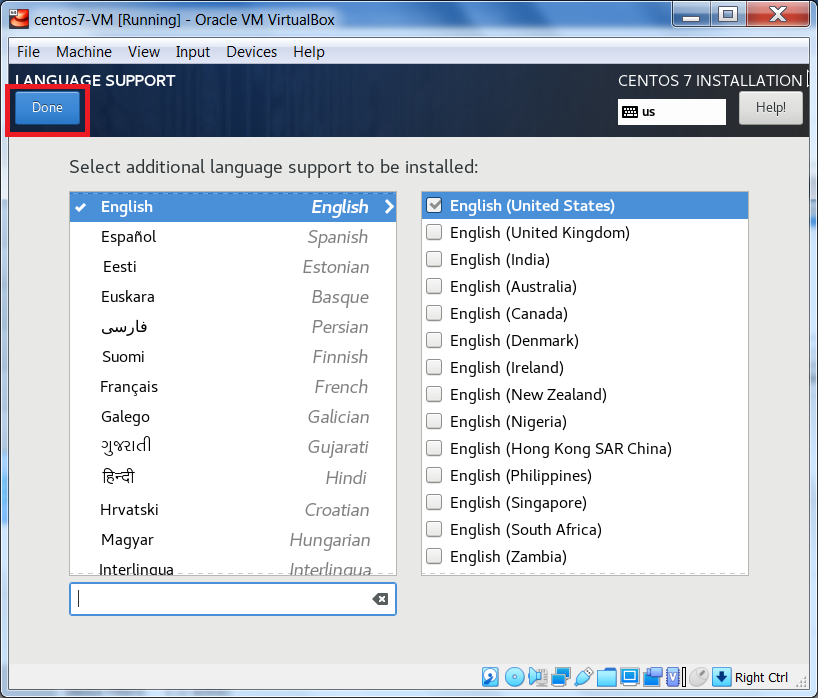
To set your language, or to add language support, from the Installation Summary page, click Language Support
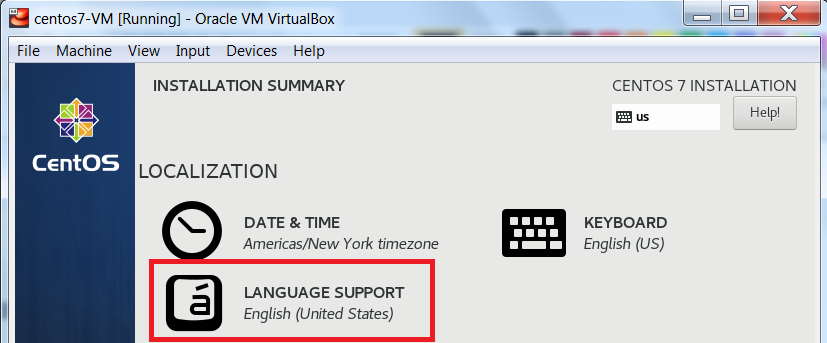
If needed, set your language and add support for other languages and click Done.
Software
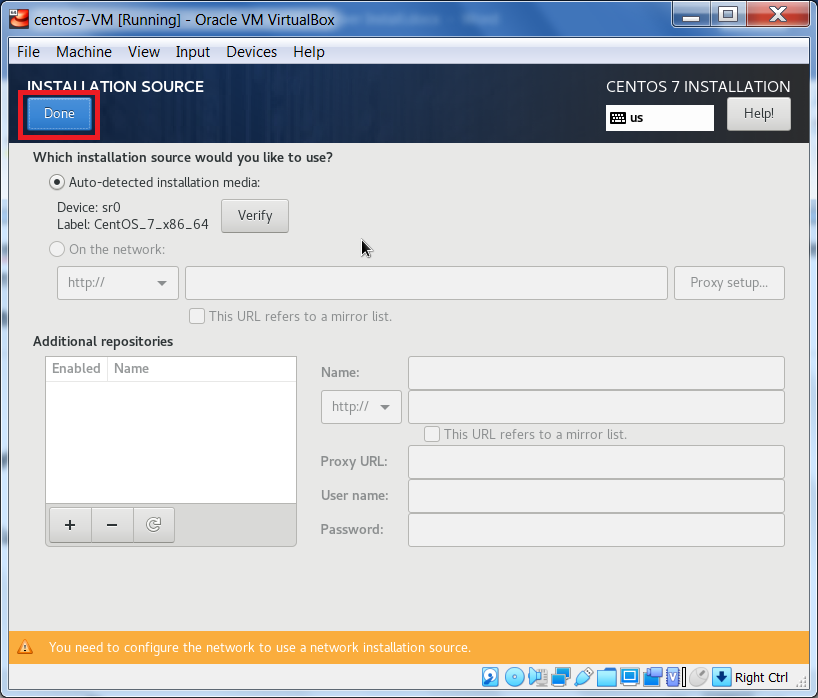
Next, from the Installation Summary page, under Software, click Installation Source.
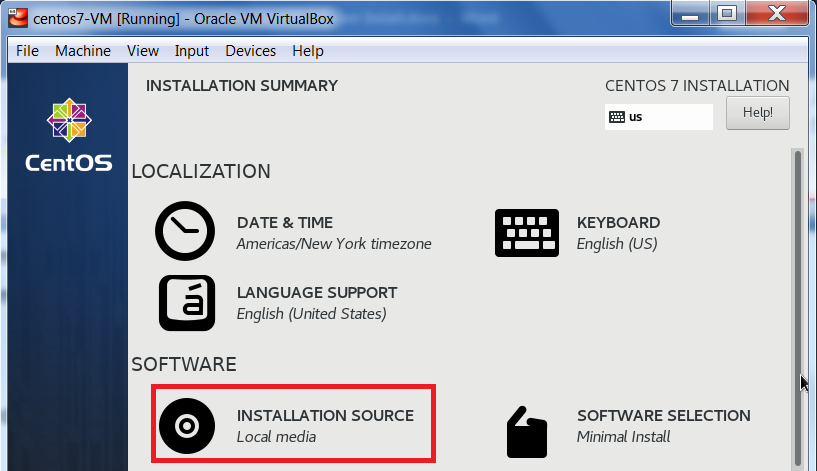
If needed, make your changes and click Done.
In my case, the Installation Source was auto-detected as local media. This means the
centos7usb.vmdk image file, attached to my virtual machine and linked to my
CentOS 7 bootable USB is being recognized as the installation source.
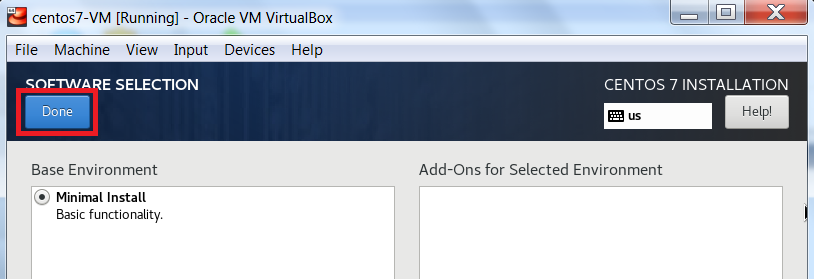
Since we are using a CentOS 7 minimal ISO image, the Software Selection is set to Minimal Install.
But, again, to be thorough, from the Installation Summary page, under Software, click Software Selection
Only the packages for a CentOS 7 Minimal Install are included in the minimal ISO image we are using.
To continue, click Done.
System
Please note that the following CentOS 7 pre-installation configuration is required.
From the Installation Summary page, under System, click Installation Destination.
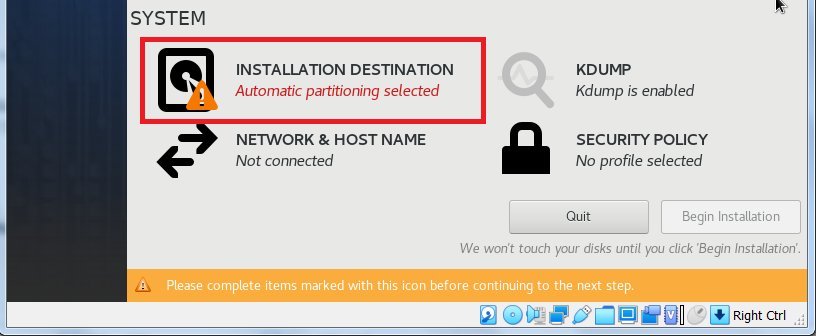
Ensure the virtual hard disk we added while creating the virtual machine has been detected and that
Automatically configure partitioning is selected. When finished, click Done.
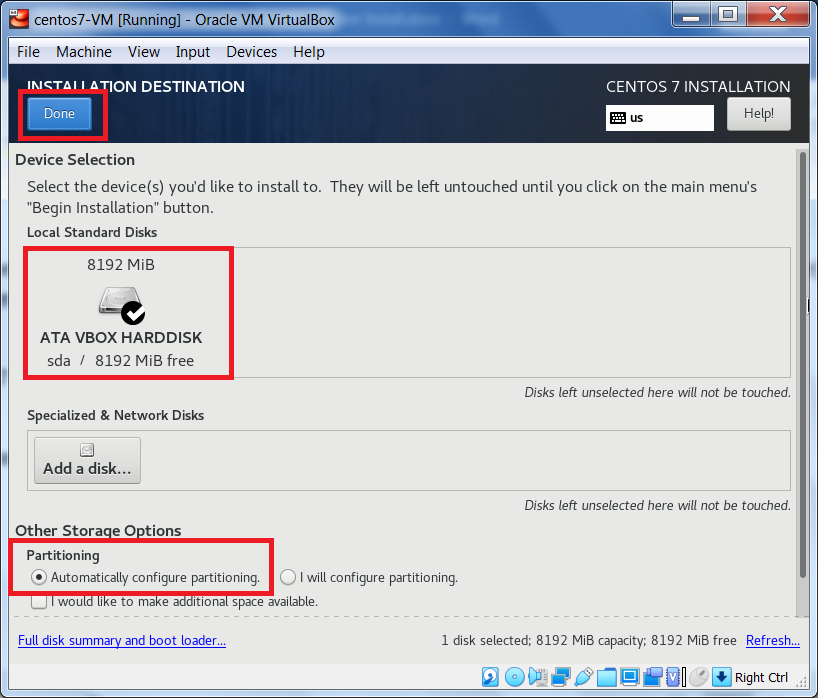
For this tutorial, we will not be manually creating our partitions. This will be done automatically for us.
The /boot, / (root) and swap partitions will be created. The / (root) and swap partitions will reside in separate
LVM logical volumes using the xfs file system, while, the /boot partition will also use the xfs file system
but will be on a standard partition.
Please note that the following CentOS 7 pre-installation configuration is required.
From the Installation Summary page, under System, click Network & Host Name
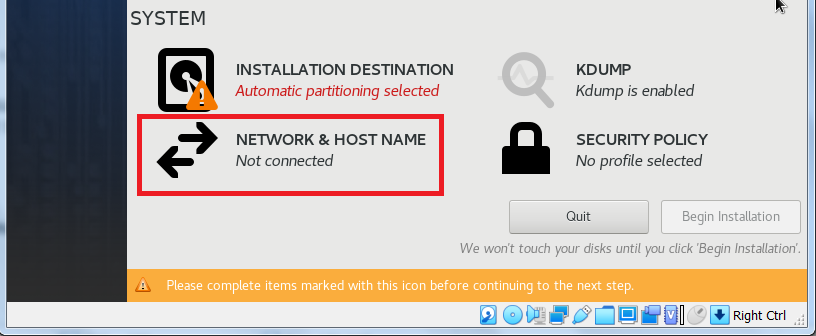
We will have to configure our IP address information and hostname. First, ensure the network adapter is selected and enable it by changing the toggle switch, on the right, from OFF to ON. This will ensure that our VM receives an IP address, subnet mask and default gateway from VirtualBox’s DHCP service (usually 10.0.2.15 /24).
Second, enter the host name. To keep it simple, I entered centos7-VM and clicked Apply. Finally, click Done.

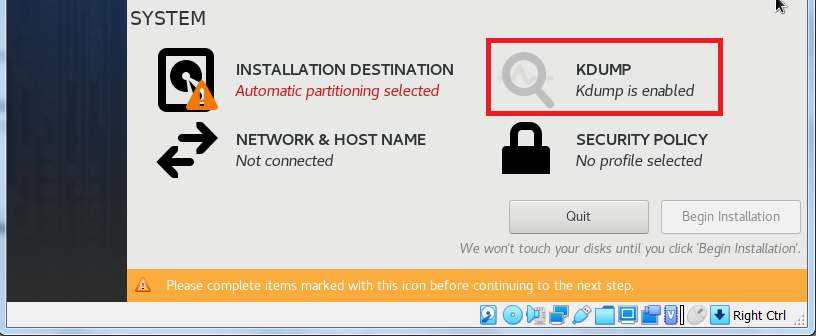
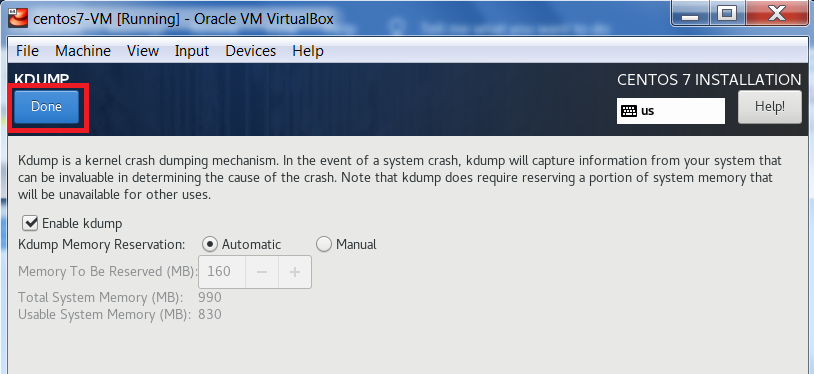
For this tutorial, we will leave KDump enabled.
To be thorough, let’s open the configuration screen.
From the Installation Summary page, under System, click KDump
KDump captures information during a kernel crash and the information can be used to determine the cause.
When you are done, click Done
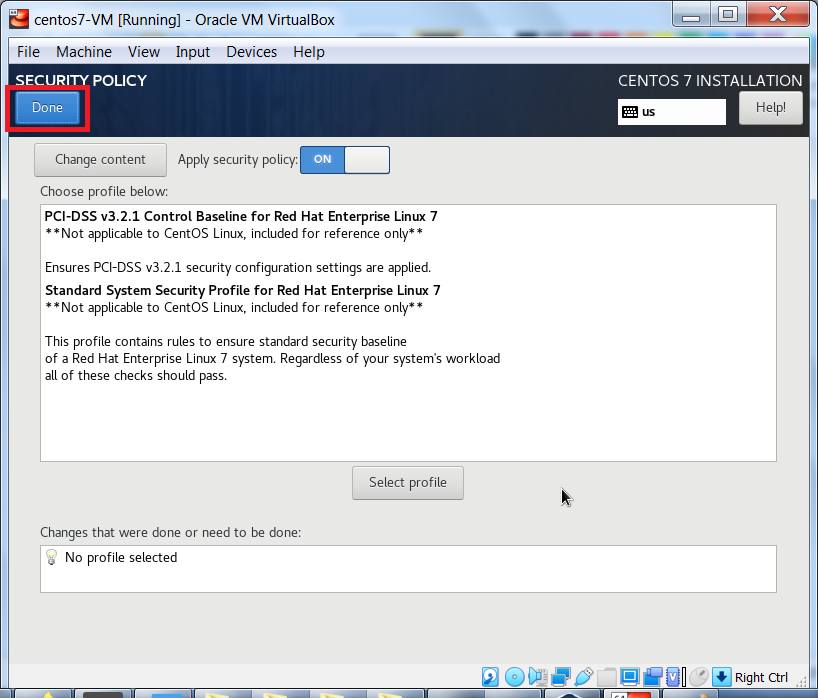
We will not be setting a Security Policy. Again, to be thorough, let’s open the configuration screen.
From the Installation Summary page, under System, click Security Policy
When no security policy is set, the sshd and
firewalld services are active, and running. Remote access using ssh is allowed through the firewall.
When you are done, click Done
We are now ready to begin the installation of CentOS 7. Click Begin Installation
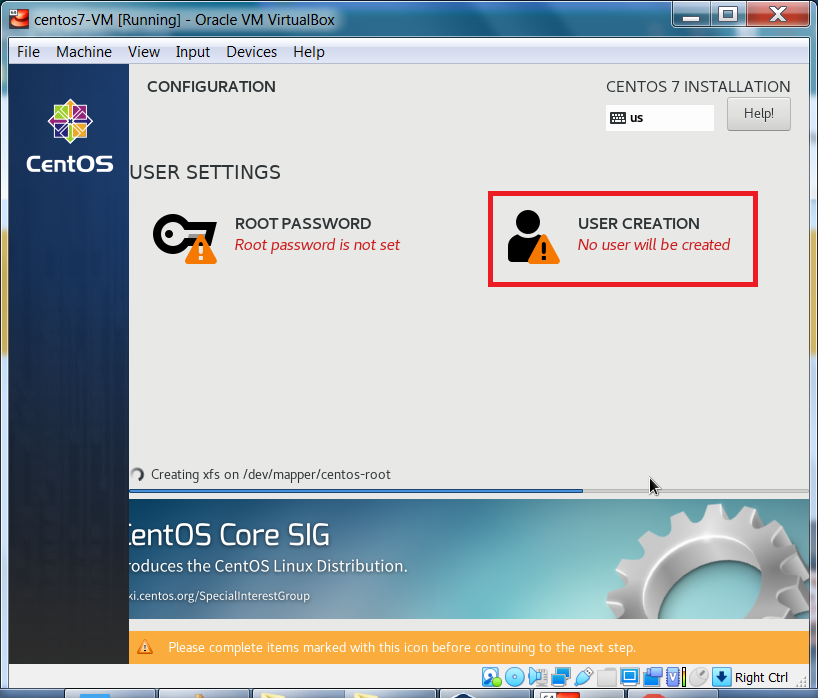
The installation has begun. We will need to set the root user’s password, as well as, create a non-root user.

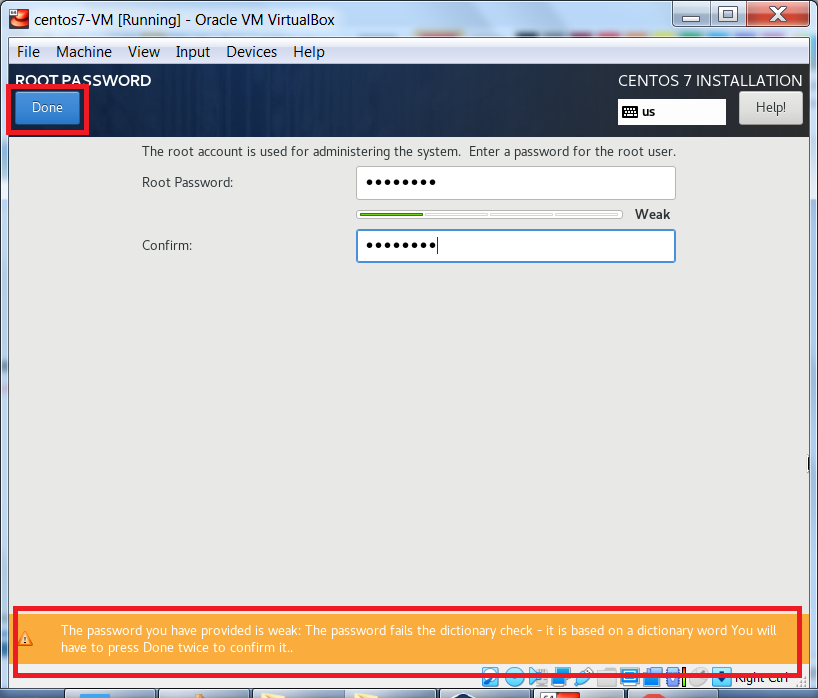
First, to set the root user’s password, click Root Password
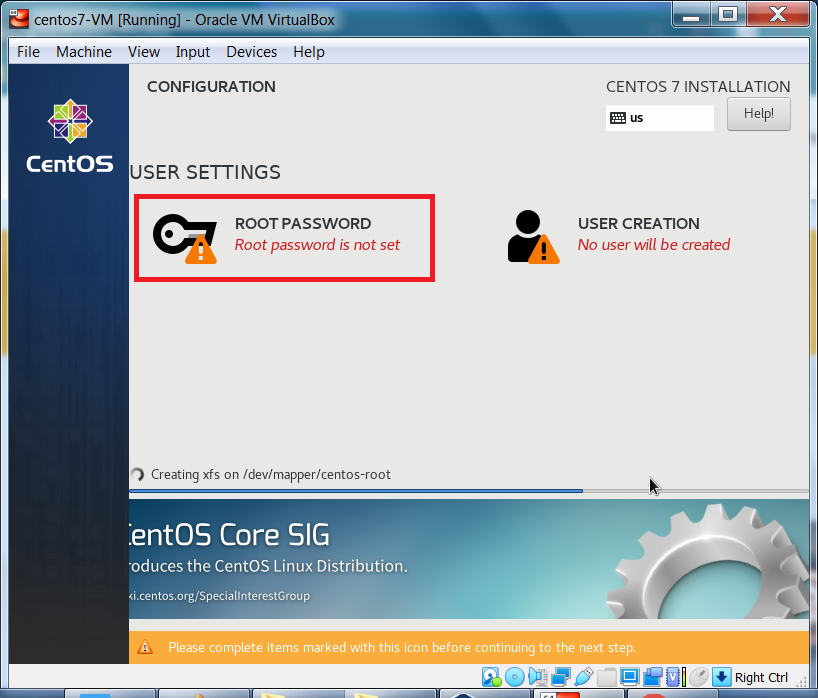
Enter the root user’s password and click Done. Notice the warning message at the bottom of the screen.
This is because I used a weak password. To bypass this warning, all we have to do is click Done, twice.
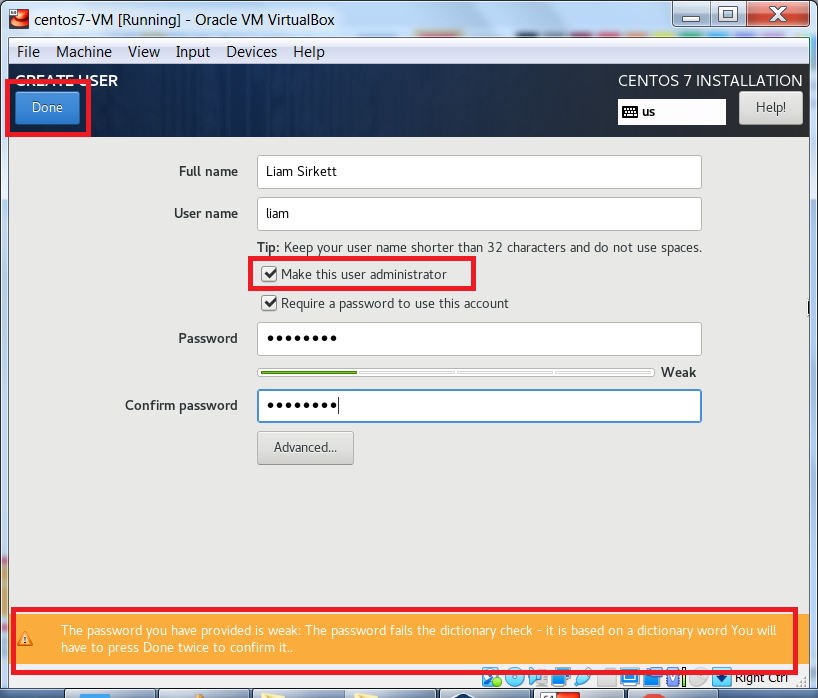
Now, to create a non-root user, click User Creation.
Enter the non-root user’s details. Next, check the box to Make this user an administrator and click Done.
Again, notice the warning message at the bottom of the screen. This is because I used a weak password.
To bypass this warning, all we have to do is click Done, twice.
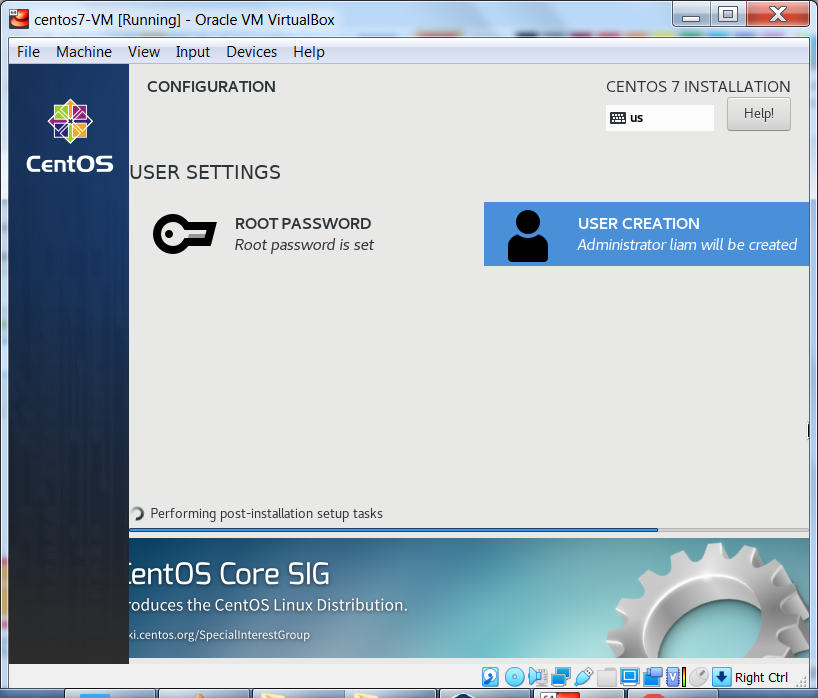
Since we are installing a minimal version of CentOS 7, the installation process will not take very long (15-20min)
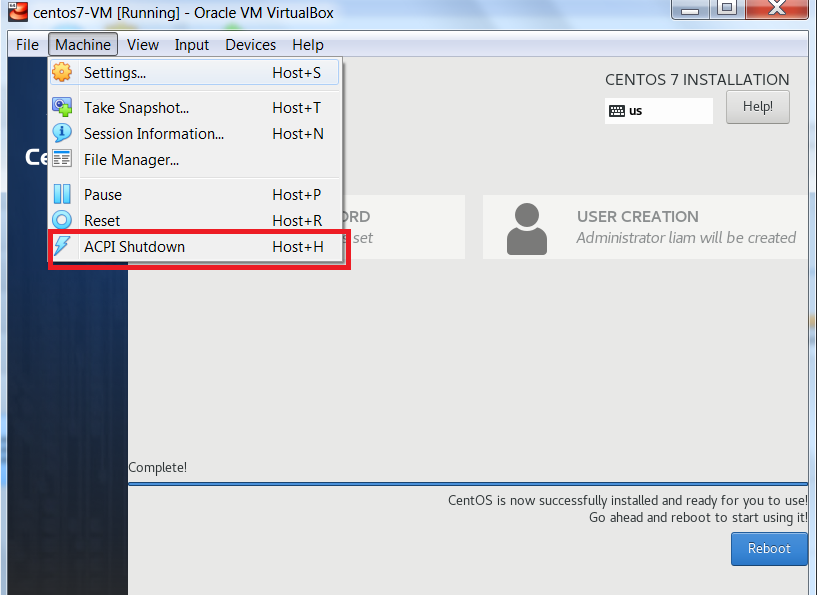
Once the installation has completed, we will first have to remove the image file linked to our bootable USB to ensure that we boot to our installed system and not begin the installation again.
From the running VM’s window, exit the guest (virtual machine) interface and return to the host machine's interface, by hitting your Host key (for Windows 7, it’s my right Ctrl key).
Now from the Machine menu item, click ACPI Shutdown to stop the VM.
Once the virtual machine has stopped, ensure your VM is selected and click Settings

Select the Storage tab, and remove the image linked to your bootable USB by clicking the icon that
Removes selected storage attachment.
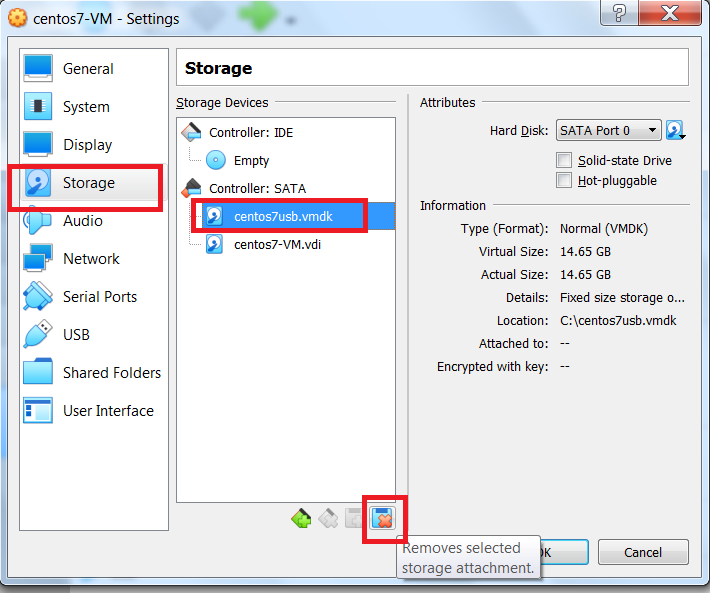
The image linked to your bootable USB has been successfully removed. To continue, click OK
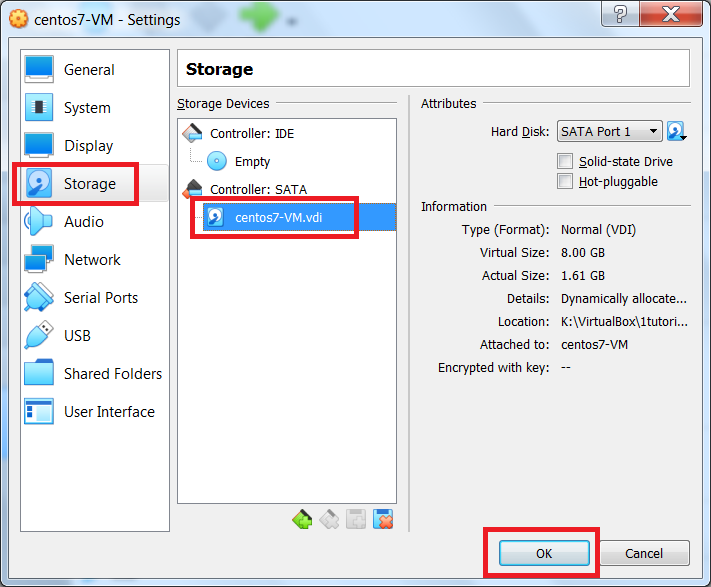
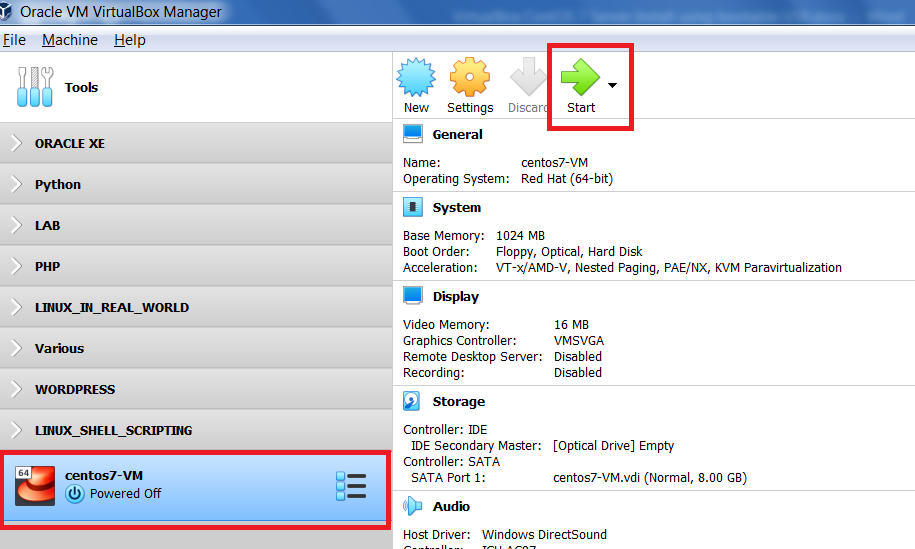
Now that we only have the virtual hard disk that contains the CentOS 7 installation, we can start the VM.
From the VirtualBox Manager interface, ensure your new VM is selected and click Start
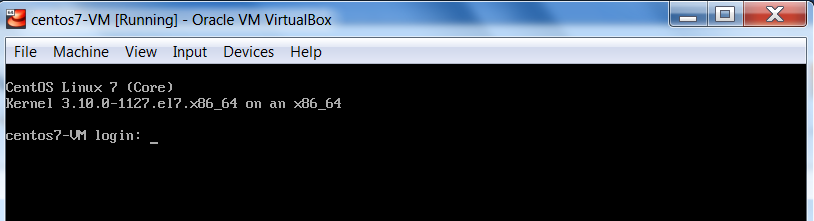
CentOS 7 is starting and we are seeing the kernel being used during the boot process.
Our CentOS 7 VM has started successfully and we see the login screen.
At the login screen, enter the username, and password, of the non-root user you created during the installation.
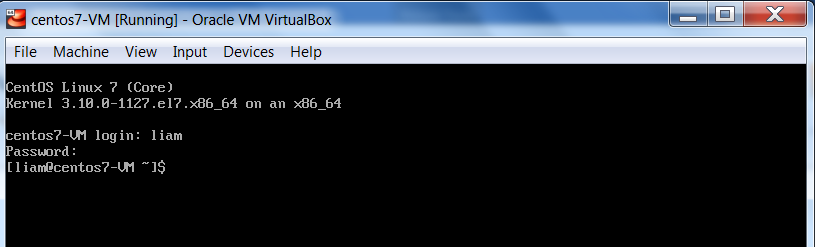
We have logged in successfully. Now, we will shutdown the virtual machine.
To do this, the non-root user (in my case, liam) must have sudo (“superuser do”) privileges. Since we set this non-root user
to be an administrator, this non-root user has sudo privileges and can execute the following command:
sudo shutdown -h now
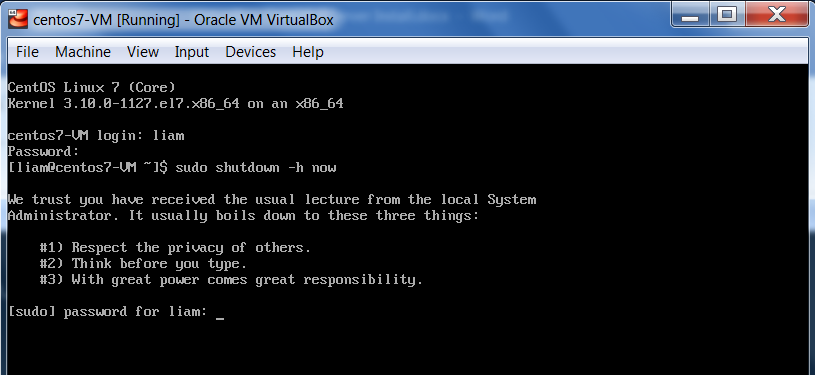
We are prompted for the non-root user’s password to confirm that we want to execute this command.
What we are doing is executing a command with the privileges of the root user.
Again, this is the reason we set our non-root user to be an administrator, so that the user has sudo privileges
and can execute commands normally only executable by the root user.
To reiterate, the command, sudo (“superuser do”), is allowing your logged in user, who is a non-root user,
to execute the command, shutdown, which can only be executed with the privileges of the root user.
Finally, after executing the command, the virtual machine will shutdown and we can return to VirtualBox Manager.
We have successfully installed a minimal version of CentOS 7 in a VirtualBox 6.1.2 virtual machine,
using a bootable USB.
Take Snapshot
To be on the safe side. After I have successfully completed a task, such as installing or updating a virtual machine, I like taking a snapshot to preserve the VM’s state. That way I ensure, in the future, if the VM stops responding, or behaving as it should, I can always revert back to that snapshot. For further information on VirtualBox Snapshots, refer to the docs, here.
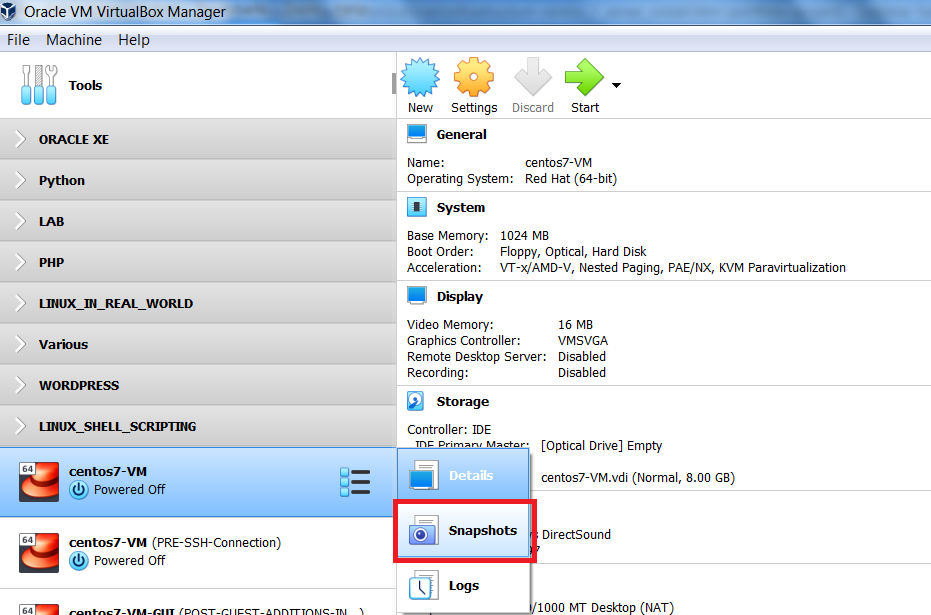
In the VirtualBox Manager interface, we are currently in Details view. To switch to Snapshots view, click the list icon next to the virtual machine name, and select Snapshots.
To take a snapshot, on the VirtualBox Manager Interface, ensure your VM is selected and click Take
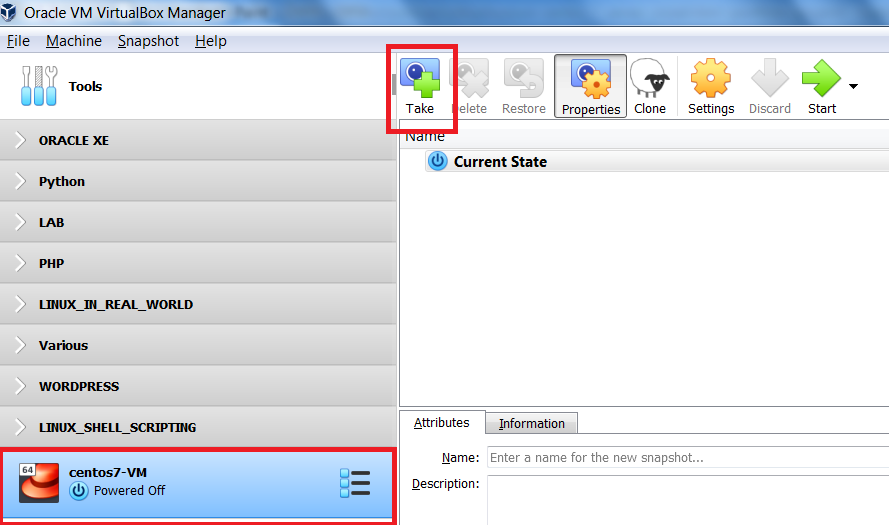
|
Enter a name for the snapshot, as well as, a short description, I've taken a snapshot POST-CentOS7-MINIMAL-INSTALL |

|
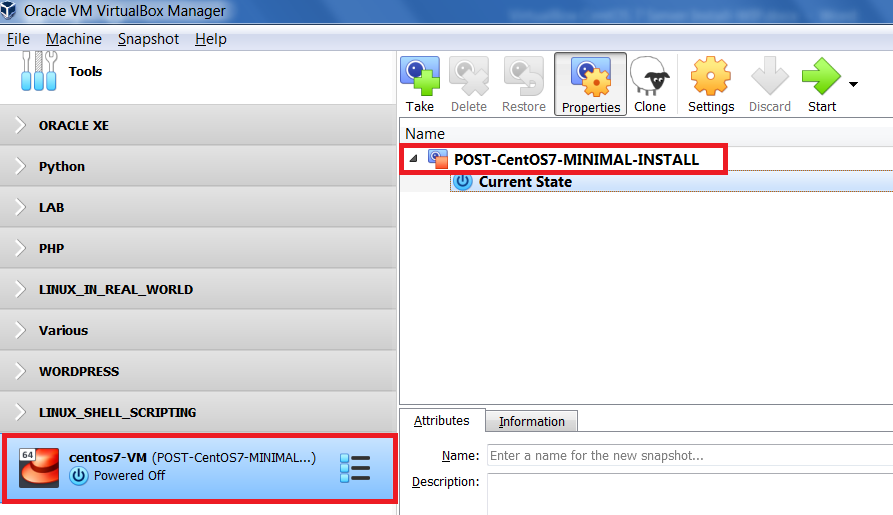
We have successfully taken a snapshot and ensure that we can always revert back to a working virtual machine with a minimal version of CentOS 7 installed.
Hopefully, you’ve enjoyed completing this tutorial and found it helpful.
After completing this tutorial, if you decide that you would like, or need, a desktop environment, you should consider
the MATE Desktop. It uses minimal system resources.
I have another tutorial that demonstrates the installation of the
MATE Desktop on a CentOS 7 minimal install VM.
It can be accessed here.
Or, you can access all of my tutorials here.
Finally, if need be, you can download this tutorial CentOS 7 Server Install using a bootable USB.